Creating Normal Maps for jerseys
This is the approved revision of this page, as well as being the most recent.
The aspect ratio of our new jersey textures is 0.5, meaning the width is half the size of the height. Our textures are delivered in the size of 512x1024. Jerseys in other sizes like 256x512 or 1024x2048 for example would work as well. It is good practice to choose a resolution smaller or equal to 512x1024 to not unnecessarily slow down the game since the bigger the texture is the smaller the frame rate becomes. For best compatibility it is also preferable to use resolutions where width and height are a power of two. The image format needs to be the PNG format. Jerseys can be made up of two texture images, a diffuse map and a normal map:
-
 1. Diffuse Map
 -
 2. Normal Map


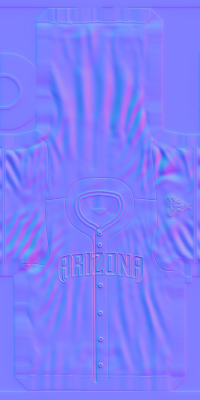
The diffuse map represents the colors that a jersey is supposed to have on its surface and the normal map represents the difference in height to show the wrinkles of the jersey or the height of the buttons or the team logo since those things are above the surface of the main jersey fabric. It is also possible to use only a diffuse texture for a jersey without the normal map, but such a jersey will not look as good and as realistic as a jersey that has a normal map as well. Have a look at the following three images:
-
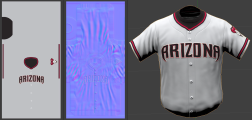 3. Jersey with diffuse and normal map
 -
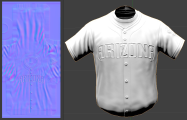
 4. Jersey without a normal map
 -
 Jersey with the normal map only


As you can see, on image 4 all the shading that is the result of small differences in height are gone when compared to image 3. Image 4 shows only the normal map related shading without the color from the diffuse map.
Creating the diffuse map
To create jersey textures you can use an image editing tool like Photoshop or Gimp. To get the positioning of the buttons or the neck piping right, please use the pattern images from this package. In regard to the buttons, there can be three different kinds of jerseys:
- without buttons
- with equally spaced buttons
- with unequally spaced buttons to give the team logo more space
Feel free to give the neck piping and buttons the color you like and place them on top of the background layer which should be in the jerseys main color. If you also want to create a normal map for your jersey, be aware that the planket pattern image should only be used for the normal map and not for the diffuse map since it represents a change in height, not a change in color. As you can see on image 6, there is no planket there. The buttons template in contrast should be used for the diffuse map and the normal map as well.
Creating the normal map
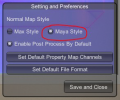
A normal map is more kind of an endproduct the computer can use for the shading calculation. To create a normal map, a height map is needed first. A height map is simply a greyscale image where darker colors represent lower positions and lighter colors higher positions, have a look at image 7. To create the height map for your jersey, please use the „height_map.png“ template image as your starting point and then place buttons, planket and logos on top of it in your favorite image editor. Such a height map can be converted into a normal map by a large number of tools and plugins for Photoshop for example. But our preferred way to create normal maps from height maps is to use a free tool called "Materialize" with the normal map style set to "Maya style", see image 8 and with the settings shown in image 9.
-
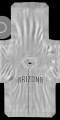 7. The height map
 -
 8. Maya style for normal maps
 -
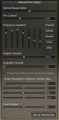 Normal map creation settings


The official version of Materialize is only available for Windows, but the application is open-source and there is a fork that has builds available for macOS and Linux. You can download Materialize for your platform from the following sources:
- Windows: https://boundingboxsoftware.com/materialize/downloads.php
- Mac / Linux: https://github.com/maikramer/Materialize/releases/tag/v0.4.2
Choosing the Maya style is important since normal maps can be of different formats which all might look correct to the untrained eye but the final result in the game will look wrong when using the wrong format. Buttons for example will then look as if they are popping in instead of popping out or it will look as if the light will come from the wrong direction.
To convert a height map to a normal map using Materialize, you first need to download and extract Materialize to a folder you like. After starting it, first set the file format to PNG and click on "Settings" to choose the Maya style like shown in image 8. Then click on the "O" on the height map element on the top left of the app screen to open your created height map, see image 10.

Naming conventions
When you create a normal map in addition to your jerseys diffuse map, please give both files the same name but add the suffix "_d.png" to the file name of your diffuse map and add the suffix "_n.png" to the file name of your normal map. Such a pair of images yould then for example have the names:
- MY_JERSEY_d.png
- MY_JERSEY_n.png
This is necessary for OOTP's file loader, which will automatically look for a normal map file that has the same name like the diffuse map but with the "_n.png" suffix instead of the "_d.png" suffix. If filenames are not respecting this convention, the normally will simply not be loaded.