OOTP Baseball:Important Game Concepts/Tools, Functions, and Editors/In-Game Editors/Ballpark Editor/Ball Locations: Difference between revisions
No edit summary |
No edit summary |
||
| Line 8: | Line 8: | ||
===== About Ball Locations ===== | ===== About Ball Locations ===== | ||
Ball locations are purely cosmetic. They control where the animated ball goes when a ball is hit when playing out a game. If you don't play out your games, there is no reason at all to bother with this page! | Ball locations are purely cosmetic. They control where the animated ball goes when a ball is hit when playing out a game. If you don't play out your games, there is no reason at all to bother with this page! | ||
Ball locations are based on the numbering system for charting hits developed by Retrosheet that assigns an alphanumeric code to each location on a ball field. See here for an explanation of Retrosheet codes. | Ball locations are based on the numbering system for charting hits developed by Retrosheet that assigns an alphanumeric code to each location on a ball field. See here for an explanation of Retrosheet codes. | ||
===== Editing Ball Locations ===== | ===== Editing Ball Locations ===== | ||
The individual ball location squares are designed to be moved by dragging and dropping. The upper left corner of a location square indicates the exact location where the ball will move to. Most of the location squares are taken directly from the standard Retrosheet format for charting hits. Some additional squares are specific to OOTP. | The individual ball location squares are designed to be moved by dragging and dropping. The upper left corner of a location square indicates the exact location where the ball will move to. Most of the location squares are taken directly from the standard Retrosheet format for charting hits. Some additional squares are specific to OOTP. | ||
To customize a ballpark image with ball locations, drag and drop the squares as appropriate. You can also directly edit the XY coordinates of a square by entering it in the chart on the left. If you do this, be sure to hit Enter to save any changes! | To customize a ballpark image with ball locations, drag and drop the squares as appropriate. You can also directly edit the XY coordinates of a square by entering it in the chart on the left. If you do this, be sure to hit Enter to save any changes! | ||
The OOTP-specific markers are mainly used to display the ballpark's dimensions, and are as follows. All other markers follow the Retrosheet model linked above. | The OOTP-specific markers are mainly used to display the ballpark's dimensions, and are as follows. All other markers follow the Retrosheet model linked above. | ||
* HP - Home Plate (this is where the ball animation will begin) | * '''HP''' - Home Plate (this is where the ball animation will begin) | ||
* WLL - Wall Leftfield Line (will display the wall distance at this location in the game during animation) | * '''WLL''' - Wall Leftfield Line (will display the wall distance at this location in the game during animation) | ||
* WL - Wall Left Field (will display the wall distance at this location in the game during animation) | * '''WL''' - Wall Left Field (will display the wall distance at this location in the game during animation) | ||
* WLC - Wall Left Centerfield (will display the wall distance at this location in the game during animation) | * '''WLC''' - Wall Left Centerfield (will display the wall distance at this location in the game during animation) | ||
* WC - Wall Centerfield (will display the wall distance at this location in the game during animation) | * '''WC''' - Wall Centerfield (will display the wall distance at this location in the game during animation) | ||
* WRC - Wall Right Centerfield (will display the wall distance at this location in the game during animation) | * '''WRC''' - Wall Right Centerfield (will display the wall distance at this location in the game during animation) | ||
* WR - Wall Rightfield (will display the wall distance at this location in the game during animation) | * '''WR''' - Wall Rightfield (will display the wall distance at this location in the game during animation) | ||
* WRL - Wall Rightfield Line (will display the wall distance at this location in the game during animation) | * '''WRL''' - Wall Rightfield Line (will display the wall distance at this location in the game during animation) | ||
[[File:Autoarrange.png|center|frameless|396x396px]] | |||
These locations are the most important above. By adjusting these and hitting "'''Auto-Arrange Locations'''" if you adjust the locations listed above EVERYTHING else, based on where the locations above are moved on the picture. If these seem off, start with home plate. Put the top left corner of the box on HP. Then do your foul poles. Put the top left corner of WLL and WRL right at the base of the wall intersecting the foul poles. Then move to WC and put the top left corner of the box at dead centerfield. Next work on your Leftfield and Rightfield gaps, WLC and WRC and put them where it looks like they are right between WC, WL, and WR. Last, if your WL and WR do not seem like they are even, adjust them. Once you feel like your HP, WLL, WL, WLC, WC, WRC, WR, and WRL looks like they are all set, hit the "'''Auto-Arrange Locations'''" button, just above Y Coordinate and all the other locations will be adjusted for you. | |||
Latest revision as of 23:23, 12 September 2024
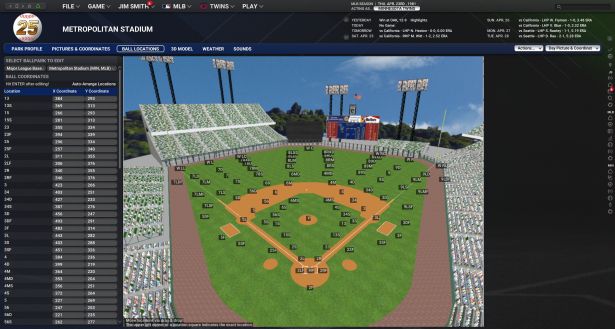
The Ball Locations screen is where you can change the ball locations for your ballparks:

Use the Select Ballpark drop-down to choose a ballpark to edit. You can also change ballpark pictures here, as described on the Pictures & Coordinates page.
Note: The Action menu in the lower right was described on the Ballpark Editor overview page. Refer there if you need to know what those functions do!
About Ball Locations
Ball locations are purely cosmetic. They control where the animated ball goes when a ball is hit when playing out a game. If you don't play out your games, there is no reason at all to bother with this page!
Ball locations are based on the numbering system for charting hits developed by Retrosheet that assigns an alphanumeric code to each location on a ball field. See here for an explanation of Retrosheet codes.
Editing Ball Locations
The individual ball location squares are designed to be moved by dragging and dropping. The upper left corner of a location square indicates the exact location where the ball will move to. Most of the location squares are taken directly from the standard Retrosheet format for charting hits. Some additional squares are specific to OOTP.
To customize a ballpark image with ball locations, drag and drop the squares as appropriate. You can also directly edit the XY coordinates of a square by entering it in the chart on the left. If you do this, be sure to hit Enter to save any changes!
The OOTP-specific markers are mainly used to display the ballpark's dimensions, and are as follows. All other markers follow the Retrosheet model linked above.
- HP - Home Plate (this is where the ball animation will begin)
- WLL - Wall Leftfield Line (will display the wall distance at this location in the game during animation)
- WL - Wall Left Field (will display the wall distance at this location in the game during animation)
- WLC - Wall Left Centerfield (will display the wall distance at this location in the game during animation)
- WC - Wall Centerfield (will display the wall distance at this location in the game during animation)
- WRC - Wall Right Centerfield (will display the wall distance at this location in the game during animation)
- WR - Wall Rightfield (will display the wall distance at this location in the game during animation)
- WRL - Wall Rightfield Line (will display the wall distance at this location in the game during animation)

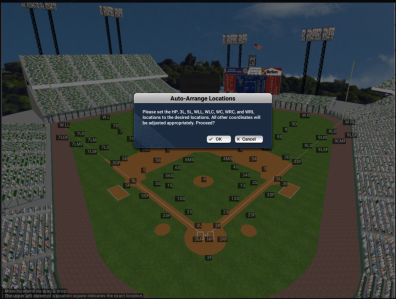
These locations are the most important above. By adjusting these and hitting "Auto-Arrange Locations" if you adjust the locations listed above EVERYTHING else, based on where the locations above are moved on the picture. If these seem off, start with home plate. Put the top left corner of the box on HP. Then do your foul poles. Put the top left corner of WLL and WRL right at the base of the wall intersecting the foul poles. Then move to WC and put the top left corner of the box at dead centerfield. Next work on your Leftfield and Rightfield gaps, WLC and WRC and put them where it looks like they are right between WC, WL, and WR. Last, if your WL and WR do not seem like they are even, adjust them. Once you feel like your HP, WLL, WL, WLC, WC, WRC, WR, and WRL looks like they are all set, hit the "Auto-Arrange Locations" button, just above Y Coordinate and all the other locations will be adjusted for you.
